


Now that you have installed the Tape Library option, you must configure your changer to work with ARCserveIT.
Steps for configuring your changer
Perform the following steps to get your system ready for use with your changer:
1. Make sure you have root or root equivalent privileges.
You must be logged in as arcroot (or have equivalent privileges).
2. Open the Device Management window.
All changer configuration options can be found under Device Manager.
3. Click the Device Group Configuration button.
The Device Group Configuration window appears.

|
By default, ARCserveIT will create a group for each drive in the changer. To configure a changer group these drives need to be removed from the default groups, before they will become available.
If your changer is currently associated with a device group, you must remove it from the group by highlighting the device, and clicking Remove. Once this is done the changer device will become available.
|
4. Select the Library tab.
5. Select the Changer.
6. Select Options.
The Changer Option screen appears: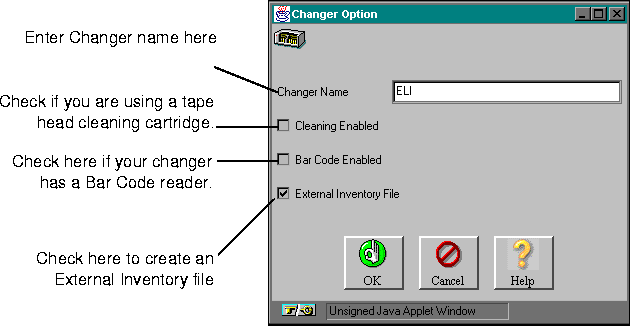
7. Enter a name for the changer, select the appropriate option, and click OK.
The options available for selection are:
- Tape Cleaning - If your changer is configured with a cleaning tape, select this option.

|
Always reserve the last slot in a changer to be used for the tape cleaning cartridge. ARCserveIT will reserve this slot for use by the tape cleaning cartridge and will never span to this tape or allow you to use it for any backup job.
|
- External Inventory file - If you want ARCserveIT to create an inventory file containing the changer's media information, select this option. ARCserveIT will always perform this operation on first time configurations.
- Bar Code Reader - If your changer is equipped with a bar code reader, select this option.
8. From the Group section of the configuration screen, select New.
The New Group dialog box appears.
9. Enter a unique group name.
10. Select the starting slot number, and the ending slot number the changer device will operate on.
The slot range entered will now be associated with this device group.

|
As shown above, ARCserveIT allows you to allocate a range of slots to a particular device group. This is useful when configuring for example, a fifty slot changer, where Group A could be allocated to slots 1-25, while Group B could be associated with slots 26-50.
|
11. Select a drive associated with your changer from the Available Devices list.
12. Highlight the newly created group.
13. Click Assign to move the drive to the device group.
The selected device will now be displayed as belonging to the device group you created under the changer.
12. Click OK to save your changes.
13. Click Yes to re-start the Media Server.
ARCserveIT writes your new library configuration to its asmediad.cfg file and causes the Media Server to re-start. You must then re-access the Device Manager window in order for the new settings to take effect.
Refer to `The Media Server configuration file' for more information about ARCserveIT's asmediad.cfg file.

|
If you wish to swap or add another changer, you must run asmediad_setup.
|
