![]() At the Advanced Server command prompt, use the sysadm command to create a printer (not a class). Be sure to select the correct printer type, for example, hplaserjet for a generic Hewlett-Packard printer.
At the Advanced Server command prompt, use the sysadm command to create a printer (not a class). Be sure to select the correct printer type, for example, hplaserjet for a generic Hewlett-Packard printer.
To connect and configure a UNIX system printer in the LP Print subsystem, follow the instructions included with the printer and in your UNIX system documentation and observe the following guidelines:
![]() At the Advanced Server command prompt, use the sysadm command to create a printer (not a class). Be sure to select the correct printer type, for example, hplaserjet for a generic Hewlett-Packard printer.
At the Advanced Server command prompt, use the sysadm command to create a printer (not a class). Be sure to select the correct printer type, for example, hplaserjet for a generic Hewlett-Packard printer.
![]() Use the accept printername command to allow the printer to accept jobs.
Use the accept printername command to allow the printer to accept jobs.
![]() Use the enable printername command to enable the printer.
Use the enable printername command to enable the printer.
![]() Type lp -dprintername /etc/passwd. The system displays this message:
Type lp -dprintername /etc/passwd. The system displays this message:
request id is printername -# (1 file)
If the printer prints the /etc/passwd file (a list of UNIX system logins on your server), the printer is configured correctly.
If the printer does not display the /etc/passwd file, a problem has occurred. Ensure the printer is plugged in and powered on. Check the printer cable installation. Then, check the printer configuration information.
When you complete this procedure, you have configured the UNIX system’s LP Printer which will be used as a printer port when you add a printer (shared printer queue) using the Add Printer Wizard from a Windows NT Workstation computer.
After you physically have connected print devices and configured the LP Printer system, you must add a printer (shared printer queue). To do this, run the Add Printer Wizard from the Printers folder that is focused on an Advanced Server. You can focus on an Advanced Server printer folder in the following ways:
![]() Click on Start and Run and enter the server name.
Click on Start and Run and enter the server name.
![]() Click on Start, Find, and Computer, and enter the server name.
Click on Start, Find, and Computer, and enter the server name.
![]() Highlight the server name in Network Neighborhood.
Highlight the server name in Network Neighborhood.
|
Permission Required to Add a Printer To create a shared printer queue, you must be logged on as a member of the Administrators, Server Operators, or Print Operators group. |
In Advanced Server, printers are added and managed remotely from Windows NT 4.0 client computers on the network. When you add a printer to Advanced Server, you are creating a shared printer queue.
To add a printer in Advanced Server, you should perform the following tasks:
![]() Select the port (or LP Printer). (If you are using a printer pool, select multiple ports.)
Select the port (or LP Printer). (If you are using a printer pool, select multiple ports.)
![]() Select the printer manufacturer and model.
Select the printer manufacturer and model.
![]() Enter the name of the shared printer queue in the Printer name field. If Windows 3.x clients and MS-DOS clients will be connecting to the printer, use a short file name. Do not use any spaces in the printer name
Enter the name of the shared printer queue in the Printer name field. If Windows 3.x clients and MS-DOS clients will be connecting to the printer, use a short file name. Do not use any spaces in the printer name
![]() Set the share name of the printer (shared printer queue) so that it is available to network users by ensuring that the Shared option is selected. (The share name is the same as the printer or shared printer queue name.)
Set the share name of the printer (shared printer queue) so that it is available to network users by ensuring that the Shared option is selected. (The share name is the same as the printer or shared printer queue name.)
![]() Choose which hardware platforms and operating systems to support (Windows NT clients on Alpha, MIPS, Power PC, or x86 computers and Windows 95 clients).
Choose which hardware platforms and operating systems to support (Windows NT clients on Alpha, MIPS, Power PC, or x86 computers and Windows 95 clients).
After you define the general characteristics of your shared printer queue, you are prompted to assign it certain device-specific properties such as fonts, printer memory, and color. The way in which you set properties depends on how you want users to access print devices. If you do not change specific properties, Advanced Server uses the default settings.
For more information, see Planning How Users Access Printers (Shared Printer Queues).
After you create a shared printer queue, it appears in the network-wide printer browse list. Windows NT and Windows 95 clients can connect to printers from this list using the Add Printer Wizard.
For more information about sharing printers, see Sharing a Printer (Shared Printer Queue).
For information on specifying which hardware platforms and operating systems to support, see "Installing Printer Drivers for Multiple Hardware Platforms" later in this chapter.
For information on setting device-specific properties, see Setting Device-Specific Properties.
For information on installing a print driver for an unsupported printer, see "Installing a Printer Driver for an Unsupported Printer" later in this chapter.
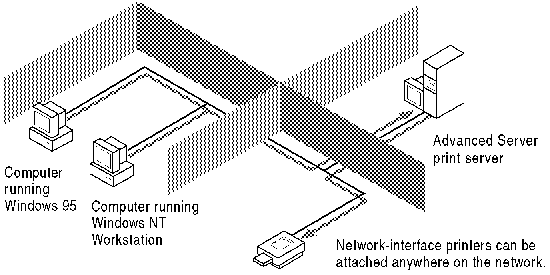
Unlike parallel and serial devices, print devices with built-in network adapter cards do not have to be physically connected to the print server. Where you locate these types of print devices has no effect on printing performance, assuming users and print devices are not on opposite sides of a network bridge or gateway.
An Advanced Server print server can control dozens of network-interface printers, depending on the server’s processing capability, the amount of installed memory, and the size and number of documents typically sent to the print server. To maintain high server throughput levels, increase memory as you add print devices.
Network-interface print devices are attached to the network through a built-in adapter card or add-on attachment, as shown in the following illustration.
In most cases, you must determine the network-print device’s address before you can add printers to Advanced Server using the Add Printer Wizard. If you are printing over TCP/IP, you usually need the print device’s TCP/IP address. If you are printing to a Hewlett-Packard network-interface print device, run a self-test to obtain the network card address.
This section also discusses the following topics:
![]()
![]()
![]()
![]()
![]()