RealServer has two methods that reduce the number of streams while distributing high-quality live streams: splitting and multicasting.
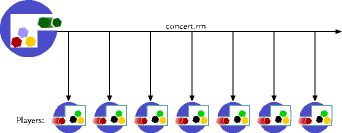
In delivering clips, RealServer sends one stream to each client that requests a clip. This method is called unicasting. A server can easily become overloaded when many clients connect to a single server to receive a presentation. Also, the network can easily become saturated with media data being sent from RealServer to many clients.
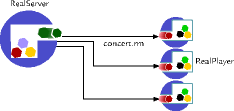
Splitting makes efficient use of RealServer networking and resources by redirecting one live stream to another RealServer, which in turn serves the stream to other clients. The load on the original RealServer is thus reduced.
Multicasting is an efficient way of broadcasting a live event over a multicast-enabled network. Multicasting uses less network bandwidth since data packets are sent to all clients via a single transmission. There is no point-to-point connection made between the client and server for the data stream.
Splitting and multicasting are used only for live content.
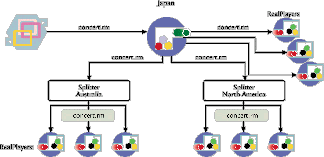
Splitting solves the problem of one server getting overloaded by stream requests for live material. In splitting, one or more RealServer servers join the main RealServer to distribute the number of streams. Rather than having all the requests come to one server, the RealServer to which the encoder is attached (also called the source splitter, or just the RealServer) sends one stream to the other RealServer (called the splitter). The splitter can also serve the content, thus multiplying the number of available streams.
For example, a concert from Japan can be broadcast over the Internet to RealServers in Australia and North America. Users in those cities connect to the RealServer closest to them, thereby getting better media quality and performance. While serving content that originated on another computer, a RealServer can simultaneously stream its own content.
Web pages listing the event would have different links for different locations:
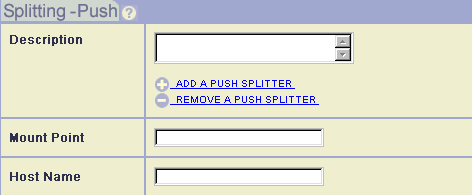
There are two types of splitting: push splitting and pull splitting.
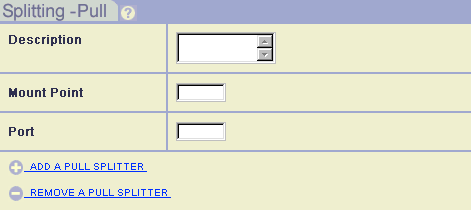
In pull splitting, the link to split material includes the locations of both the source and the splitter. It requires few changes to the configuration file on either computer.
Just as in unicasting, both splitting methods support bandwidth-negotiated files (such as SureStream).
Push Splitting requires more setup time, but it can mean faster connections to the first client requesting a split stream.
In push splitting, RealServer and the splitter are in constant communication. When a client requests a file from the splitter, a connection has already been established between the splitter and RealServer and the file is delivered to the client almost immediately. If there is already a connection between splitter and RealServer and a new encoder hooks up, RealServer will immediately feed that stream to the splitter.
You can limit which directories are split by setting a variable in the relevant directory section.
In pull splitting, the link on the Web page lists the splitter and the RealServer where the streamed file originates.
When the splitter gets a request for the live file, it opens a stream to the RealServer, and the RealServer streams the file to the splitter, which, in turn, streams it to the client.
This method only uses bandwidth when a client requests a split stream. In addition, the only configuration steps are to make certain that both the RealServer and the splitter have a splitter file system listed.
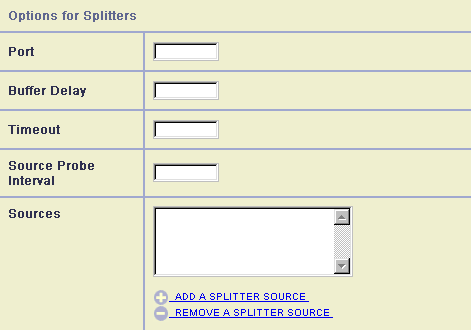
You can specify the splitters that are allowed to query your RealServer for live streams by adding their IP addresses to the Access Control list. In this list, you indicate the ports to which they can send their requests.
If you do not limit the splitters, any splitter can access your server.
You can combine these methods to make the best use of your bandwidth.
To set up push splitting, make changes in three places:
|
|
Additional Information |
|---|
| Information on editing the configuration file is found in Chapter 4: Customizing RealServer Features. |
You are returned to RealSystem Administrator. Look in the Options for Splitting Settings area.
Yes in the Split All Streams list.
Enabled or Disabled.
0 to 32767; the default value is 30.
30.
Access Control list. Add one rule for each IP address or range of addresses. List the port or ports to which the receive splitters can direct their requests. See "Limiting Access Via IP Address" for instructions.
11001.
Lib directory.
You are returned to RealSystem Administrator. Look in the Options for Splitters area.
0 to 32767 in the Splitter Timeout box. The default value is 30.
0 to 32767. The default value is 30.
rtsp://domain_name:RTSPPort/Splitter_MountPoint/SplitterHostName/Live_MountPoint/Virtual_Directory/filename.xxx
| Component | Meaning |
|---|---|
| rtsp | The protocol used for streaming. |
domain_name |
Domain name of this RealServer. IP address may be substituted. |
RTSPPort |
Port number where RealServer listens for requests sent via RTSP. This value is usually 554; see "Port Variables". |
Splitter_MountPoint |
The push splitting mount point used on this RealServer, usually /farm/. |
SplitterHostName |
The source RealServer's SplitterHostName value. To allow the client to receive streams which differ only by the source server's SplitterHostName, use an asterisk (*). If multiple connections exist which match the query, this splitter decides which stream the client will receive. |
Live_MountPoint |
Mount point for live content on the source. |
Virtual_Directory |
The virtual directory, as defined by the encoder. |
filename.xxx |
The name of the live stream. |
This URL can be used on both the source RealServer and the splitter. Be sure to use the domain name for the system where the link is located: on the source, use the source domain name, and on the splitter, use the splitter domain name.
Like push splitting, pull splitting has three steps:
Configuring the source and the splitter is a quick matter; setting up the URL is more complicated.
3030.
/split/.
The link that appears on the Web page that points to the receive splitter looks like this:
protocol://splitter[:protocol_port]/splitter_MountPoint/source:[source_port]/source_MountPoint/filename
For example, links in the sample shown at the beginning of this chapter would look like the following (note that the direct link to the Japan server is not in pull splitting format):
...we hope you enjoy the concert! Choose the link nearest you:

<a HREF="http://Japan.company.com.ja/concert.rm">Japan</a></p>
<a href="http://Australia.company.com.au:8080/split/
Japan.company.com:3030/encoder/concert.rm">Australia</a></p>
<a href="http://NorthAmerica.company.com:8080/split/
Japan.company.com:3030/encoder/concert.rm">North America
</a></p>
Multicasting is a way of sending a single live stream to multiple clients, rather than sending a stream to each of them.
In contrast, regular unicasting transmission sends a stream to each client who requests it:
To take advantage of multicasting, both RealServer and clients, as well as the routers between them, must be multicast-enabled. For this reason, multicasting is mostly used with intranets where routers can be configured for multicasts. Multicast delivery can be done over the Internet where intermediary network devices have been multicast-enabled, such as UUNET and the Internet Multicast Backbone (Mbone).
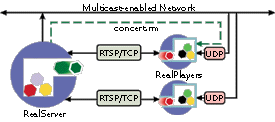
RealServer includes two methods of multicasting: back-channel multicast, which has methods for RTSP and PNA multicast, and scalable multicast. You can use all methods at once.
Back-channel multicast maintains a TCP control channel between the client and RealServer. RealServer uses this channel to provide information about the presentation and to query the client for a user name and password, if authentication is in use. The client uses the TCP channel to send password information and commands such as "play" and "stop". With this information, RealServer can track how many clients are viewing a presentation. Monitoring tools such as the monitoring graph in RealSystem Administrator will show client activity.
Scalable multicast does not use this TCP control channel. It thus takes up far less bandwidth and administrative overhead. Monitoring tools such as G2 Java Monitor will not track client activity.
In both RTSP and PNA multicast, authenticated material and client statistics can be sent because the exchange between the client and RealServer is bi-directional.
This method of multicasting uses RTSP to send control information over a TCP channel. RealServer maintains a control connection for each client. The data channel is multicast to all clients.
RTSP multicast provides the following features:
RTSP multicasting works only with RealSystem G2 clients.
PNA multicast uses the PNA protocol over a TCP connection to exchange information between the client and RealServer.
PNA multicast is used when transmitting to older clients (pre-G2). RealServer maintains a control connection for each client. The data channel is multicast to all clients.
PNA multicast supports the following features:
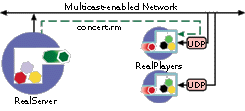
Scalable multicasting allows you to transmit to an unlimited number of clients because the transmission from the RealServer is completely one-way; there is no connection from each client to RealServer at all. All data is multicast on the network once. Each client connected to this multicast receives all data packets.
It is thus suitable for situations that would otherwise consume much bandwidth.
Scalable multicasting uses a different URL format than either RTSP multicast or PNA multicast.
This methods supports G2 clients only; clients version 5.0 and older will not receive any presentations.
The following table summarizes the benefits of each multicast method.
The following table shows the features of the three multicast methods, as they apply to clients
| Back-Channel Multicast | Scalable Multicast | ||
|---|---|---|---|
| Feature | RTSP | PNA | |
| RealSystem G2 clients only | · | ||
| Older clients | · | ||
| RealSystem G2 clients or any RTP-enabled clients | · | ||
Material served via back-channel multicast appears in the access log just like unicast material. The access log shows which method was used to transmit the stream.
Scalable multicasts may be identified in the access log by their mount point in the GET statement.
Because the communication between the RealServer and client during scalable multicast is the client's initial request for the multicast, the only statistics RealServer can track are the number of initial requests for the presentation. Information about the client is not available to RealServer. Statistics normally shown by Stats Mask will not appear for scalable multicasts. (See "StatsMask Results" for more information.)
To take advantage of multicasting, both RealServer and clients, as well as the routers between them, must be multicast-enabled. For details, consult your network administrator. This section describes only what is required to enable RealServer for multicast broadcasting.
In addition to setting up RealServer, verify with your network administrator that the routers in your network are multicast-enabled and that the system running RealServer is correctly configured for multicast support. Also, ensure that clients are configured to request multicast transmission of live material.
Each type of multicast requires an address range. Values can range from 224.0.0.0 (the lowest usable address) to 239.255.255.255. The network administrator should know which multicast addresses are available on the intranet. On the Internet, certain ranges are reserved for other uses; see RFC 1700, "Assigned Numbers" for a complete list of restricted addresses.
|
|
Additional Information |
|---|
| Information on modifying RealServer features is found in "Customizing RealServer". |
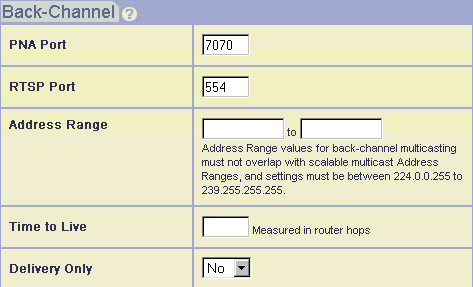
Follow the instructions below to set up back-channel multicasting.
7070.
554.
Yes from the Delivery Only list. To remove this restriction and permit unicast, set it to No.
True from the Resend list.
The value for Time to Live can range from 0 to 255. The larger the Time to Live, the greater the distance a data packet will travel.
The default value of 16 is enough to keep multicast packets within a typical internal network.
| TTL Value | Packet Range |
|---|---|
0 |
Local host |
1 |
Local network (subnet) |
32 |
Site |
64 |
Region |
128 |
Continent |
255 |
World |
Links to both RTSP and PNA multicast are identical to links for live unicast transmissions.
A single link can serve clients that are multicast-enabled and those that can only receive unicast transmissions.
Most clients on a multicast-enabled network are usually configured to request material via multicast first.
Links to back-channel multicasts are the same as for links to individual files. Because multicasts are done with live streams, use the live mount point in the URL. See "Linking a Web Page to a SMIL File or Individual Clip" for instructions on creating links to individual files.
After you set up scalable multicasting, be sure to set up special URLs for links to scalable multicast presentations.
Set up the general scalable multicasting information. In the first section on this page, do the following:
Host Address box.
/scalable/.
The following instructions describe how to configure certain live sources to be multicast.
True from the Enabled list.
To make all live broadcasts available via scalable multicast, type an asterisk (*) here.
port1-port2.The first port number must be an even number, and must be followed by the consecutive port number. (RTP is used to send the data; the RTP standard requires this format.)
address1-address2. To use a single address instead of a range, type the address in the form address1-address1.
Valid ranges are between 224.0.0.0 and 239.255.255.255. However, the addresses between 224.0.0.0 and 224.0.0.255 are reserved; in addition, RFC 1700 ("Assigned Numbers") lists additional numbers which are restricted.
TTL.
Scalable multicasts use a different URL format than other material; when RealServer receives a request in this format, it sends the material differently and does not expect to establish or maintain a TCP connection.
All links to scalable multicast content use the same format. Note that they always begin with http://and always ends with the .sdp extension:
http://realserver.company.com:HTTPPort/MountPoint/virtual_path/filename.xxx.sdp
| Component | Meaning |
|---|---|
http |
The protocol used for streaming. Always use http in Web pages. |
realserver.company.com |
Machine and domain name of RealServer |
HTTPPort |
Port number where RealServer listens for requests sent via HTTP. This value is usually 80 or 8080; see "Port Variables". |
MountPoint |
Scalable mountpoint, usually scalable. |
virtual_path |
The virtual path is any actual directory, relevant to the base path of the mount point. If the file is located in the base path itself, omit virtual_path. |
filename |
The file name itself. |
xxx |
The file type, such as ra, rm, or rt. |
sdp |
The final letters are required for scalable multicast. These are not part of the actual live file name; they only appear in the link. |
Using the example in the example for RTSP and PNA multicast, a link would look like the following:
<a HREF="http://realserver.company.com:8080/scalable/vivaldi.ra.sdp">
Click here to listen to today's Vivaldi selection</a>
To reach large audiences across a network that includes both Internet and intranet connections, use splitters to send data across the Internet to intranet sites, and then use multicast delivery within each target intranet. This can be a powerful method of distributing a live stream while still conserving bandwidth.