Concerts, presentations, speeches, can all be encoded and broadcast to clients almost instantaneously. Live presentations can be archived for later reference or later broadcast. For example, you can archive an event that happens in one time zone and then play it later for viewers in a later time zone with the G2SLTA tool.
Streaming live content is much the same as streaming static content. The only difference is the live file never actually exists. It is streamed as it's encoded, and a file is never actually created. Visitors who click a link to a live broadcast join the event as it happens, and everyone sees the same content at the same time.
RealServer can save a copy of all live broadcasts automatically, or it can save only broadcasts with specific virtual directory names.
Use the Simulated Live Transfer Agent (G2SLTA) to broadcast a stored file as if it were live. Events broadcast with G2SLTA appear to be live; everyone sees the same part of the broadcast at the same time.
|
|
Tip |
|---|
| RealBroadcast Network™ (RBN) provides full services for encoding and broadcasting events to a few or a few thousand viewers. See http://www.real.com/rbn for details. |
Setting up RealServer to broadcast live files consists of four steps:
|
|
Additional Information |
|---|
| Instructions on using RealSystem Administrator to modify RealServer is found in "Customizing RealServer". |
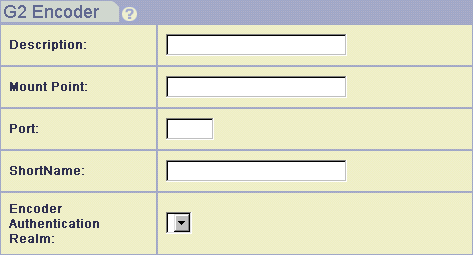
/encoder/ mount point.
4040. If you change this value, be sure to give the new port number to content creators.
EncoderRealm. Select None if you do not want to require user names and passwords from encoders.
|
|
Additional Information |
|---|
| Realms and authentication are described in Chapter 10: Authenticating RealServer Visitors. |
/live/ mount point.
5050. If you change this value, be sure to give the new port number to content creators.
If you change the password, be sure to tell content creators what password to use.
Ensure that the settings for HTTP Port, PNA Port and RTSP Port are correct. These indicate where requests will arrive at RealServer, and the links you create will need to match them.
|
|
Additional Information |
|---|
| See "Port Variables". |
When a content creator sets up the encoder to broadcast a performance, he or she will indicate the RealServer port numbers to which it should send live streams.
If a G2 encoder is in use, and you have typed a value in the Authentication Realm box (described in the previous section), the person using the encoder will need to type a user name and password.
If a pre-G2 encoder (such as RealEncoder version 5.0) is in use, and you instructed RealServer to require a password by typing in the Password box, the person using the encoder will need to type a password.
|
|
Additional Information |
|---|
| Refer to your encoding software documentation for instructions on setting up the encoder. |
Links to live events are similar to links for on-demand clips, with the addition of the mount point.
Follow the format of linking to an individual file, and use the live file mount point, usually /encoder/.
|
|
Additional Information |
|---|
| See "Links from Web Pages to Streamed Media Clips". |
Should a live stream be interrupted, you can still send information to clients, displaying a message that says "Currently experiencing technical difficulties" when a live broadcast is interrupted. This is possible by making a file that contains the message you want to display, and placing it in a subdirectory with the same name as the live mount point.
If a live stream fails to arrive at RealServer, RealServer will search for an actual directory that matches the URL. In this case, it will find the subdirectory with the error file in it.
You can save (or "archive") a live broadcast for historical purposes or for later playback. For information on playing saved files as if they were live, see the next section, "Simulating a Live Broadcast".
When live archiving is enabled, RealServer examines all arriving live streams, and compares the names of the streams with the list names within the Live Archiving section of RealSystem Administrator or the configuration file. If it contains a list whose name matches the virtual directory name of the incoming live stream, RealServer will archive the file.
If no matching list name is found, RealServer does not archive the file.
Files are archived in locations specified by Target Directory.
RealNetworks' encoding products include an option to save a copy of a file while encoding. This setting is independent of the archiving feature in RealServer. Typically, there is more storage space on the RealServer system than there is on the content creator's computer.
For each live broadcast that you want to save, you can choose to create one large file that contains everything in the original broadcast or several small files. These small files can be based on length of recording or file size. For example, RealServer can archive a continuous live feed into files each containing thirty-minutes of the broadcast, or can start a new archive file each time a certain size is met.
Large files are appropriate when you want to save an entire event in one file. If RealServer archives a live broadcast with the same destination path and file name as an existing file, RealServer automatically renames the file by appending a unique number to the end. For example, if RealServer encountered a file named concert.rm in the archive directory, it would rename it as concert.rm.86400. The new file gets the concert.rm name. The number that RealServer chooses is related to a timestamp; larger numbers indicate newer files. In this way, one directory can be used to store the latest version of a broadcast and the previous versions as well. Reusing the same output file name can simplify Web page maintenance, because the links for a recurring event remain the same.
Small files based on elapsed time are saved with the following method: as soon as the initial value indicated in the configuration file is reached, the archived file will be named filename01.rm. When the second archived file maximum size is reached, it is named filename02.rm where filename is the name of the live file stream.
File names for files based on size are named with the same method as for files archived according to elapsed time.
If RealServer tries to archive a stream for which an archived file already exists, it renames the existing file with the date and time that the live file was initiated where the date (filename) is in the format MMDDYY.
In its default configuration, RealServer puts all the files in the same directory, specified by the main mount point's Base Path.
If you want to archive all live streams, name this list with an asterisk (*) rather than typing the virtual path.
To limit the size of the archived files by time, select File Time. Select the frequency with which a new archive file will be selected; use the table below.
If you give values to both File Time and File Size, RealServer will use the first, or lower, limit.
To save entire broadcasts without limiting the file size, omit values for both File Time and File Size.
.rm extension, RealServer creates a directory named after the filename, including the extension. All the streamed files go in this subdirectory. For more information on 5.0-style bandwidth negotiation, see "Files Created with Previous Encoder Versions".
To turn off live file archiving, modify the NoArchive variable in the directory list which you do not want to archive. Set NoArchive to True.
For replaying a pre-recorded stream as if it were live, RealServer includes the G2SLTA (Simulated Live Transfer Agent). Viewers who watch a presentation join the event in progress; no matter when visitors connect, they all see the same thing at the same time.
|
|
Tip |
|---|
| Use G2SLTA to test your system in anticipation of an actual live broadcast. |
There are three steps to using G2SLTA: setting up RealServer, creating a playlist of files to stream, and running G2SLTA. You will also need to link the Web page to the broadcast.
Setup for RealServer is minimal; G2SLTA uses the G2 Encoder information.
The playlist is a list of files that G2SLTA will play. If you want to simulate a live broadcast of only one file, the playlist will refer just to that file. If you have a series of files you want to play during your simulated live broadcast, list them in sequence in the playlist. G2SLTA includes an optional command to play files in a playlist in random order. The playlist itself is a text file.
When you start G2SLTA, you give a name to the stream, similar to a mount point. This is the name that will be included in the URL. The playlist is not included in the URL.
Use the following instructions to set up G2SLTA.
This program uses the same configuration settings as the encoders. See "To configure G2 encoder mount points:".
In a text file, list each file that you want RealServer to play, one per line. Files are played in the order they are listed. File paths and names can be absolute, or they can be relative to the directory in which G2SLTA is located.
Even if you have only one presentation that you want to broadcast, you must still create a playlist file.
To include title, author, and copyright information for the entire playlist, type the following at the beginning of the file:
Title:your titleAuthor:your authorCopyright:your copyright information
The rest of the file lists the files to be played:
Title:your titleAuthor:your authorCopyright:your copyright information
first file
second file
From a command line, run G2SLTA:
g2sltahostport username passwordlivefileplaylist [-r] [-nN]
An example of a G2SLTA command:
g2slta realserver.company.com 4040 swordfish annual.rm Annual_Report.txt
|
|
Tip |
|---|
You can use both the -r and -nN switches to cycle
randomly through the playlist N times.
|
In the Web page, create a link to the content using the format described in "Linking a Web Page to a SMIL File or Individual Clip". Use the encoder mount point.